4.2.1
Correlation coefficient Summary Understand the fundamentals of this metric, what it evaluates, and how to interpret the results. Compute and visualise the metric with Python 3.13 code examples, covering key steps and practical checkpoints. Combine charts and complementary metrics for effective model comparison and threshold tuning. Correlation coefficient measures the strength of a linear relationship between two data or random variables.
It is an indicator that allows us to check whether there is a trend change of linear form between two variables, which can be expressed in the following equation.
$
\frac{\Sigma_{i=1}^N (x_i - \bar{x})(y_i - \bar{y})}{\sqrt{\Sigma_{i=1}^N(x_i - \bar{x})^2 \Sigma_{i=1}^N(y_i - \bar{y})^2 }}
$
It has the following properties
If correlation coefficient is close to 1, \(x\) increases → \(y\) also increases
The value of correlation coefficient does not change when \(x, y\) are multiplied by a low number
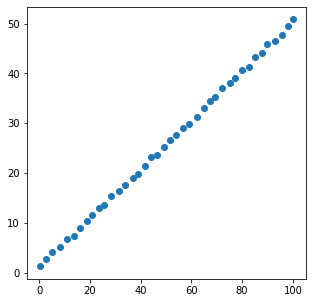
Calculate the correlation coefficient between two numerical columns
# 1
2
3
import numpy as np
np . random . seed ( 777 ) # to fix random numbers
1
2
3
4
5
6
7
8
9
10
11
12
13
14
15
16
17
import matplotlib.pyplot as plt
import numpy as np
x = [ xi + np . random . rand () for xi in np . linspace ( 0 , 100 , 40 )]
y = [ yi + np . random . rand () for yi in np . linspace ( 1 , 50 , 40 )]
plt . figure ( figsize = ( 5 , 5 ))
plt . scatter ( x , y )
plt . show ()
coef = np . corrcoef ( x , y )
print ( coef )
[[1. 0.99979848]
[0.99979848 1. ]]
Collectively compute the correlation coefficient between multiple variables
# 1
2
3
4
5
import seaborn as sns
df = sns . load_dataset ( "iris" )
df . head ()
<tr style="text-align: right;">
<th></th>
<th>sepal_length</th>
<th>sepal_width</th>
<th>petal_length</th>
<th>petal_width</th>
<th>species</th>
</tr>
<tr>
<th>0</th>
<td>5.1</td>
<td>3.5</td>
<td>1.4</td>
<td>0.2</td>
<td>setosa</td>
</tr>
<tr>
<th>1</th>
<td>4.9</td>
<td>3.0</td>
<td>1.4</td>
<td>0.2</td>
<td>setosa</td>
</tr>
<tr>
<th>2</th>
<td>4.7</td>
<td>3.2</td>
<td>1.3</td>
<td>0.2</td>
<td>setosa</td>
</tr>
<tr>
<th>3</th>
<td>4.6</td>
<td>3.1</td>
<td>1.5</td>
<td>0.2</td>
<td>setosa</td>
</tr>
<tr>
<th>4</th>
<td>5.0</td>
<td>3.6</td>
<td>1.4</td>
<td>0.2</td>
<td>setosa</td>
</tr>
Check the CORRELATION COEFFICIENCES between all variables
# Using the iris dataset, let’s look at the correlation between variables.
1
df . corr () . style . background_gradient ( cmap = "YlOrRd" )
<tr>
<th class="blank level0" > </th>
<th class="col_heading level0 col0" >sepal_length</th>
<th class="col_heading level0 col1" >sepal_width</th>
<th class="col_heading level0 col2" >petal_length</th>
<th class="col_heading level0 col3" >petal_width</th>
</tr>
<tr>
<th id="T_dbd76_level0_row0" class="row_heading level0 row0" >sepal_length</th>
<td id="T_dbd76_row0_col0" class="data row0 col0" >1.000000</td>
<td id="T_dbd76_row0_col1" class="data row0 col1" >-0.117570</td>
<td id="T_dbd76_row0_col2" class="data row0 col2" >0.871754</td>
<td id="T_dbd76_row0_col3" class="data row0 col3" >0.817941</td>
</tr>
<tr>
<th id="T_dbd76_level0_row1" class="row_heading level0 row1" >sepal_width</th>
<td id="T_dbd76_row1_col0" class="data row1 col0" >-0.117570</td>
<td id="T_dbd76_row1_col1" class="data row1 col1" >1.000000</td>
<td id="T_dbd76_row1_col2" class="data row1 col2" >-0.428440</td>
<td id="T_dbd76_row1_col3" class="data row1 col3" >-0.366126</td>
</tr>
<tr>
<th id="T_dbd76_level0_row2" class="row_heading level0 row2" >petal_length</th>
<td id="T_dbd76_row2_col0" class="data row2 col0" >0.871754</td>
<td id="T_dbd76_row2_col1" class="data row2 col1" >-0.428440</td>
<td id="T_dbd76_row2_col2" class="data row2 col2" >1.000000</td>
<td id="T_dbd76_row2_col3" class="data row2 col3" >0.962865</td>
</tr>
<tr>
<th id="T_dbd76_level0_row3" class="row_heading level0 row3" >petal_width</th>
<td id="T_dbd76_row3_col0" class="data row3 col0" >0.817941</td>
<td id="T_dbd76_row3_col1" class="data row3 col1" >-0.366126</td>
<td id="T_dbd76_row3_col2" class="data row3 col2" >0.962865</td>
<td id="T_dbd76_row3_col3" class="data row3 col3" >1.000000</td>
</tr>
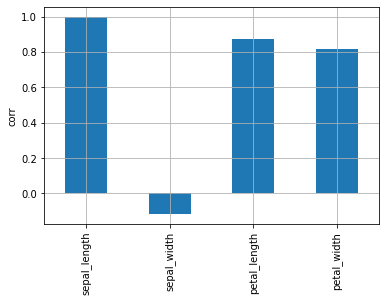
In the heatmap, it is hard to see where the correlation is highest. Check the bar chart to see which variables have the highest correlation with sepal_length.
1
df . corr ()[ "sepal_length" ] . plot . bar ( grid = True , ylabel = "corr" )
When correlation coefficient is low
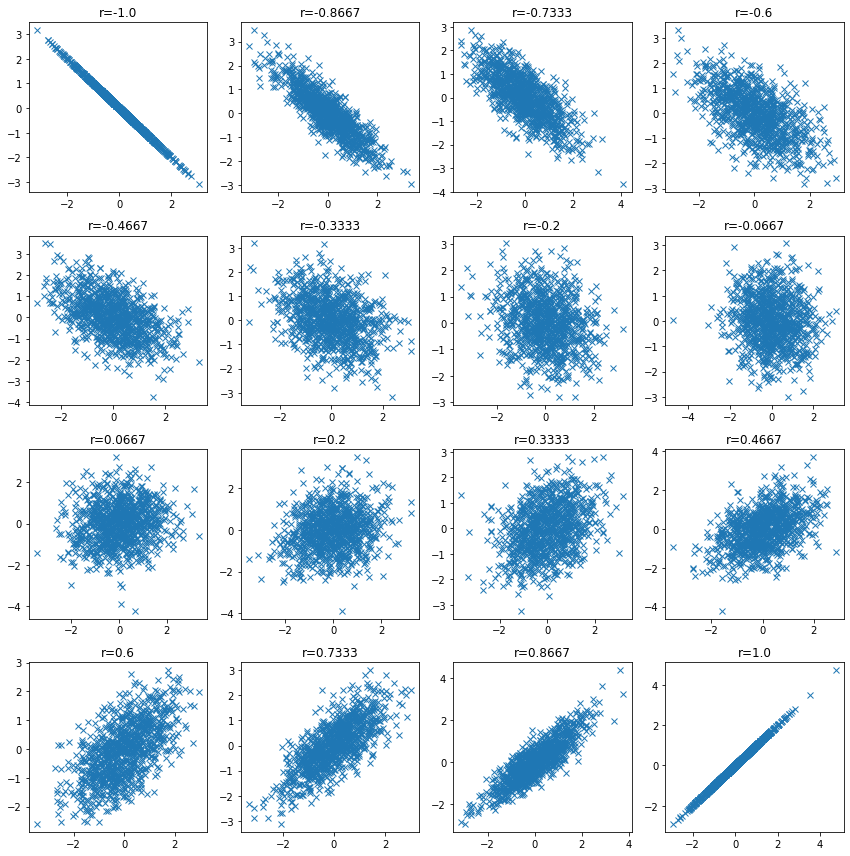
# Check the data distribution when the correlation coefficient is low and confirm that the correlation coefficient may be low even when there is a relationship between variables.
 1
 2
 3
 4
 5
 6
 7
 8
 9
10
11
12
13
14
15
16
17
18
19
20
21
22
23
n_samples = 1000
plt . figure ( figsize = ( 12 , 12 ))
for i , ci in enumerate ( np . linspace ( - 1 , 1 , 16 )):
ci = np . round ( ci , 4 )
mean = np . array ([ 0 , 0 ])
cov = np . array ([[ 1 , ci ], [ ci , 1 ]])
v1 , v2 = np . random . multivariate_normal ( mean , cov , size = n_samples ) . T
plt . subplot ( 4 , 4 , i + 1 )
plt . plot ( v1 , v2 , "x" )
plt . title ( f "r= { ci } " )
plt . tight_layout ()
plt . show ()
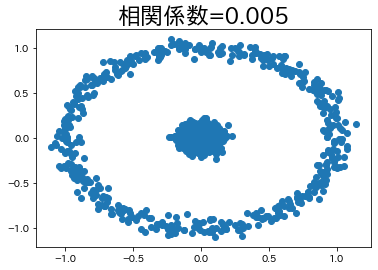
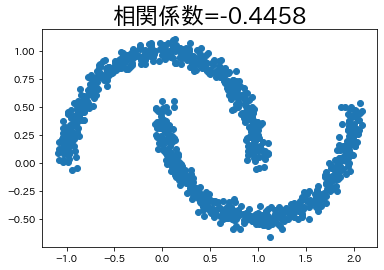
In some cases, there is a relationship between variables even if the correlation coefficient is low.
We will try to create such an example, albeit a simple one.
1
2
3
4
5
6
7
8
9
10
11
12
13
14
15
16
17
18
19
20
21
22
23
24
25
26
27
import japanize_matplotlib
from sklearn import datasets
japanize_matplotlib . japanize ()
n_samples = 1000
circle , _ = datasets . make_circles ( n_samples = n_samples , factor = 0.1 , noise = 0.05 )
moon , _ = datasets . make_moons ( n_samples = n_samples , noise = 0.05 )
corr_circle = np . round ( np . corrcoef ( circle [:, 0 ], circle [:, 1 ])[ 1 , 0 ], 4 )
plt . title ( f "correlation coefficient= { corr_circle } " , fontsize = 23 )
plt . scatter ( circle [:, 0 ], circle [:, 1 ])
plt . show ()
corr_moon = np . round ( np . corrcoef ( moon [:, 0 ], moon [:, 1 ])[ 1 , 0 ], 4 )
plt . title ( f "correlation coefficient= { corr_moon } " , fontsize = 23 )
plt . scatter ( moon [:, 0 ], moon [:, 1 ])
plt . show ()