決定木(分類)
決定木(分類)とは、ルールの組合せで分類をするモデルの一種。ルールの集まりは木の形をしたグラフ(木構造)で表現されていて解釈がしやすいです。
このページでは決定木の分類を実行し、さらにその結果できた木を可視化します。
import numpy as np
import matplotlib.pyplot as plt
from sklearn.datasets import make_classification
from sklearn.tree import DecisionTreeClassifier, plot_tree
サンプルデータを作成
2クラス分類をするためのサンプルデータを作成します。
n_classes = 2
X, y = make_classification(
    n_samples=100,
    n_features=2,
    n_redundant=0,
    n_informative=2,
    random_state=2,
    n_classes=n_classes,
    n_clusters_per_class=1,
)
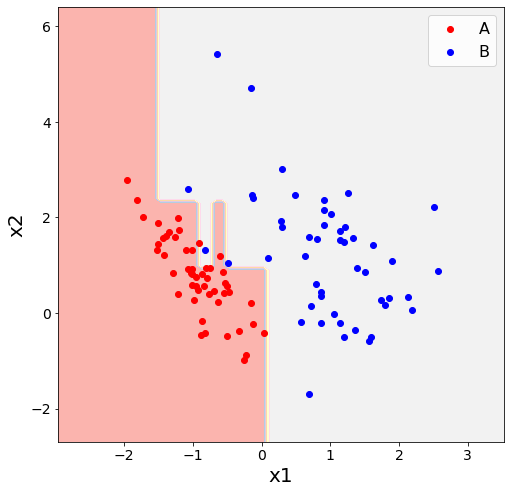
決定木を作成
DecisionTreeClassifier(criterion="gini").fit(X, y)でモデルを訓練し、作成した木の決定境界を可視化します。
criterion="gini"は分岐を決めるための指標を指定するオプションです。
# モデルの訓練
clf = DecisionTreeClassifier(criterion="gini").fit(X, y)

# 決定境界のカラーマップ用データ
x_min, x_max = X[:, 0].min() - 1, X[:, 0].max() + 1
y_min, y_max = X[:, 1].min() - 1, X[:, 1].max() + 1
xx, yy = np.meshgrid(np.arange(x_min, x_max, 0.1), np.arange(y_min, y_max, 0.1))
Z = clf.predict(np.c_[xx.ravel(), yy.ravel()])
Z = Z.reshape(xx.shape)

# 決定境界を可視化
plt.figure(figsize=(8, 8))
plt.tight_layout()
cs = plt.contourf(xx, yy, Z, cmap=plt.cm.Pastel1)
plt.xlabel("x1")
plt.ylabel("x2")

# ラベルごとに色を分けてプロット
for i, color, label_name in zip(range(n_classes), ["r", "b"], ["A", "B"]):
    idx = np.where(y == i)
    plt.scatter(X[idx, 0], X[idx, 1], c=color, label=label_name, cmap=plt.cm.Pastel1)

plt.legend()
plt.show()
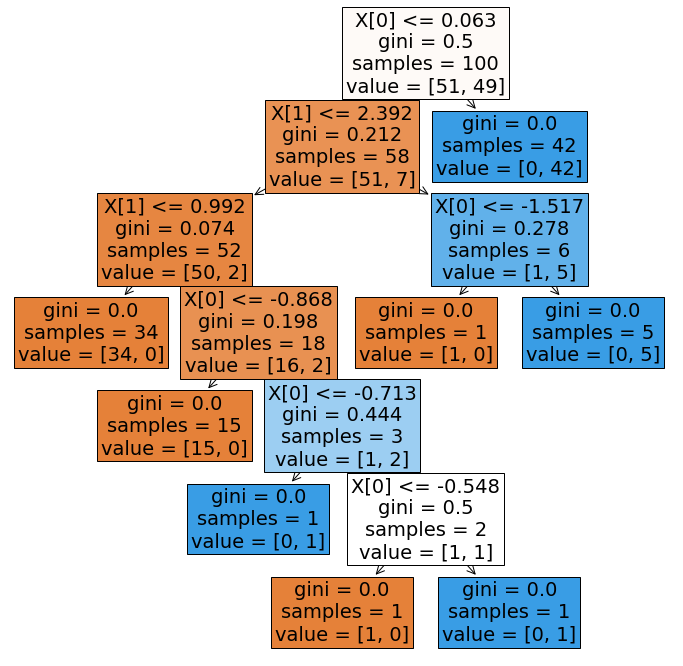
決定木の構造を画像で出力
plt.figure()
clf = DecisionTreeClassifier(criterion="gini").fit(X, y)
plt.figure(figsize=(12, 12))
plot_tree(clf, filled=True)
plt.show()
<Figure size 432x288 with 0 Axes>